
How to Put Countdown Timers in Ontraport Emails
Some links on this page are affiliates links and I may, at no additional cost to you, receive compensation if you decide to purchase. Please be assured I only recommend products I believe in and use myself.
In this blog, let’s talk about how to put countdown timers in Ontraport emails. Countdown timers are always popular in email marketing. They are an effective way to communicate a deadline visually, whether that is for ending a sale, closing down an application period, or counting down to an announcement.
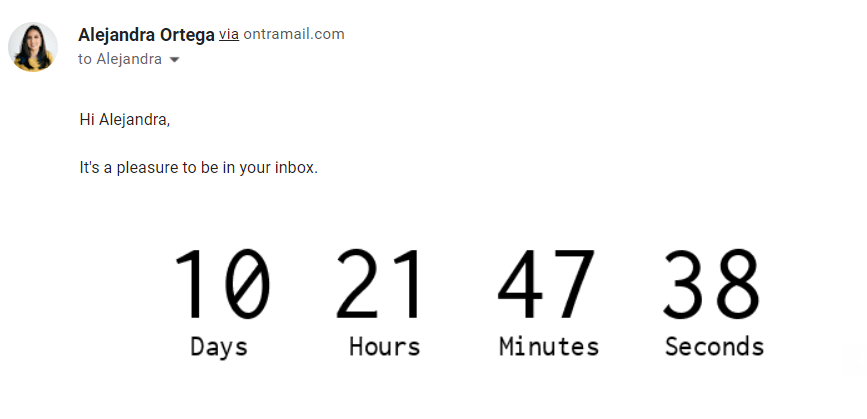
Countdown timers are easy to insert on webpages, but present more of a challenge in emails. While Ontraport itself does not have a native way to create countdown timers in emails, there are myriad tools that can do this and provide you some html code to put in your emails (I recommend PlusThis).
The challenge is that Simple Email and Ontramail, the newer mail editors in Ontraport, don’t translate html code that is put in as text. So if you try to simply paste code into your email, it looks like code when it lands in your inbox.
But there is a way around this! And it only takes a few easy steps. I learned this years ago from someone in the Ontraport support group on Facebook, and I am excited to share it with you.
As usual, the steps are outlined in writing under the video below, in case you like that better.
What do you need?
We’re going to need a few things for this process:
- Code from your timer tool (I recommend PlusThis)
- A Long Text field
- An email message
- An automation
Create a Long Text Field
Depending on how old your Ontraport account is, your top navigation might say Contacts or Automations. Whichever it is, hover over it, and click Settings > Field Editor
Click Add Field in the section of your choosing, and select Long Text Field. Name it something that makes sense to you.
Click Save.
Create Email Message
Next, let’s create an email message that used the field you just created as a merge field.
You can do this in Ontramail or in Simple email. Use the Merge Field option to select your field and add it to the body of the email where you want the countdown time to show.
Save your email.
Create the automation
In your automation, find the place where your email will be sent, either on a specific date or after a wait.
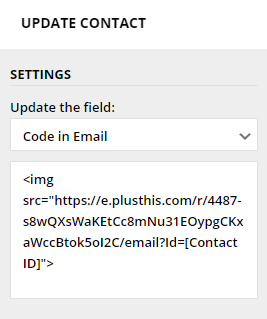
Insert an Update Contact element.
Choose the long text field you created, and paste the code you grabbed from your timer tool in the blank box.
Under the Update Contact element, add an Email element and choose the message where you used the merge field for the field you created.
Complete your automation as you normally would.
How does it work?
By putting code in the contact record, and then using a merge field to insert that code into an email, the code is translated and displayed as an image instead of text.
This method can be used to display a variety of things that come in code, not just countdown timers.
If you are running multiple campaigns with timers, you can use multiple fields for storing the code for each one. However, if you are only using one of these at a time, you can re-use the field in subsequent campaigns. Just make sure that you update the code in your automations.
A note on PlusThis
PlusThis is not the only countdown tool out there. Deadline Funnel is a popular one for evergreen timers. But PlusThis is much more than a countdown timer.
PlusThis is a collection of tools that can enhance your Ontraport account and take your automations to another level.
The timer tool allows you to set timers that expire on specific dates, and also timers that reference a date stored in a contact record, which is great for evergreen campaigns.
Other PlusThis tools allow you to:
- Store personal zoom links in a contact record so you can track attendance to your webinars and tag attendees in Ontraport
- Create Add to Calendar links for your emails
- Track whether a contact watches a video on an Ontraport page
- and much more
You can learn more about me and how I provide Ontraport support here.