
How to Create a Block List in Ontraport
Some links on this page are affiliates links and I may, at no additional cost to you, receive compensation if you decide to purchase. Please be assured I only recommend products I believe in and use myself.
In the blog, let’s talk about how to create a block list in Ontraport.
Why use a block list?
In my experience, a block list is used when somebody has disrespected my client’s team, or crossed some boundaries and therefore are no longer welcome to interact with this business. For example, someone who bought something and then didn’t respect your terms and conditions might not be welcome to buy from you again.
As usual, the write up with step by step instructions is below the video.
How to create a block list automation
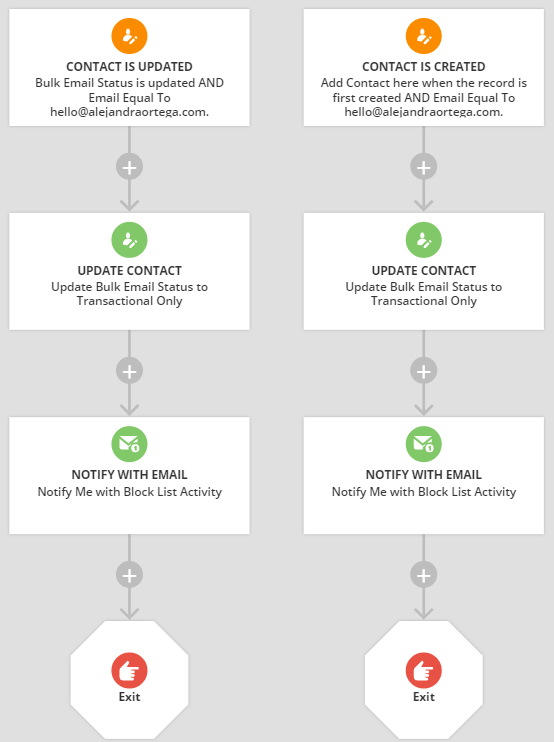
Ontraport does not have a block list as a functionality. So we create one by using an automation. Your automation will detect if any new contacts are created with specific email addresses, or if existing contacts who were unsubscribed try to opt back in for your emails. If they do, they will be unsubscribed again immediately.
- Go to Automations and create a new automation
- Start from Scratch
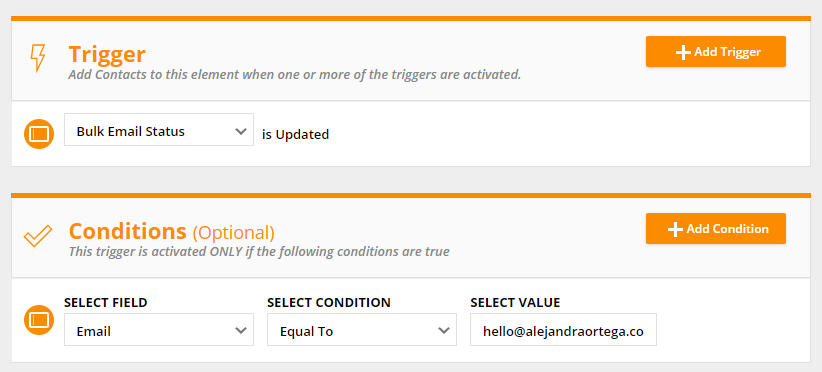
- Create a trigger with Field is Updated. The field to use is Bulk Email Status.
- Add a conditional to your trigger that says Field is this value. The field to use is Email. And input the email address of the contact you want to block.
- Next, add an Update Contact element. Choose the field Bulk Email status to update. By default, Ontraport will only update that field to Transactional Only (which means unsubscribed), so you don’t have to add any settings.
- Then add an exit point under that element so a contact exits the campaign after they are unsubscribed.
- You can also add another tree with the same settings, but with the trigger being Contact is created. This would be applicable if the contact you want to block has been removed from your system altogether
Bonus: Get notified of any activity
If you want to be kept informed of any activity from your block list, you can set some notifications to yourself or your team.
- In your automation, between the Update Contact element, and the exit point, add one more element. A Notify with Email element (you could also do SMS if that is enabled in your account).
- Select the user you want to notify, or set a custom email address
- Choose the email you want to send as a notification. I would create one that tells me the name and email of the contact who tried to opt in by including those merge fields.
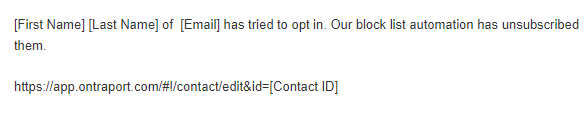
This way, whenever the contact that we’re trying to block tries to re-join our list, they will immediately be opted out. And then you or someone you choose will be notified that this person tried to opt back in.
That is one way you can create a block list in Ontraport to protect your boundaries and your team.
You can learn more about me and how I provide Ontraport support here.